Monday Morning Musings

I woke up this morning at 4:51 thinking that my dream was odd (no, I can’t remember clearly what it was about now, but I think it involved an old friend marrying a clown), but more importantly, that I needed to have a plan. It seems that all good blogs have a theme, or a sense of structure. Since my Pinterest Interests are all over the place, I was having a hard time building a structure for the blog that would be easy for you, my readers, to follow. As it was, one day, I’d blog about lamps, the next it would be a new recipe. And then I could spend the next few posts showing updates to the house. The hardest part is that I felt a little overwhelmed at all the possibilities, because I want to try all the pins immediately. My dad says it’s because I’m spontaneous, I just think I’m slightly ADD 🙂
So, I’ve come up with a plan. It’s not 100% coherent yet, but it’s a start. Every day of the week will have its own category, and sometimes two or three. Here’s the lineup so far…
Sunday Funnies
Makeover Monday
Tasty Tuesday
Wednesday Workout
Thrifty Thursday or
Thoughtful Thursday
Photo Friday
Saturday Solutions

Of course, I will try my best to stick to the schedule, but I know I’ll probably have days that I have to share something totally irrelevant to what the day is supposed to be about.
Another brainstorm I had, which could be a little harder to figure out, is that I know there are so many other bloggers out there trying new things because of Pinterest, and I would love to see what my readers are trying. So, I want to have every post be a link party. If you have a makeover you’d like to share in Monday, link it up! Make something delicious? Link it up to a Tasty Tuesday post! You get the idea, right? Give me a few days to figure that out though, I’ve only just found out what Linky parties are!

I guess my blog makeover qualifies for my first Makeover Monday? Just kidding. I’m working on a real makeover today and will post it today if I get it done in time. If not, it will have to keep until next week…this structured thing might be harder than I thought… 🙂

Thanks for stopping by!
Eliesa

The light (fixture) hurts my eyes…

When we first looked at our new house, I loved the natural light that filled it. What I didn’t like were all the light fixtures. Every one of them were builder-grade, and the cheapest ones at that.

There were “pimple” light globes in the bathrooms, hallways and even our bedroom.

Every single one of the bathrooms had these light bars above the sink.

And the fans on the porch were literally shaped like domes, their blades drooping. I wish I had pictures of them, but it was one of the first things we changed out because they were a safety hazard (and more importantly, UGLY!).

We’ve been slowly changing out the lights, mostly waiting until I find a great buy or when I just can’t take another day of staring at them. Home Depot and Lowe’s have been great for finding clearance lighting at ridiculously low prices. The other day, I went to Home Depot and found a bunch of their display lights were on clearance for 75% off of the clearance price!! I picked up this for $11…

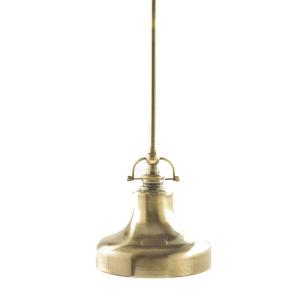
And this one for $12…

And they replaced two of the ugly globe lights. Love them!

While I was there I also picked up this for $19 – yes, $19!! They were originally selling for $129 at the store. I’m using a picture from the Home Depot website because it’s still in the box. Online, they are on clearance selling for $38 – I think there are a few more at the store if you are interested.
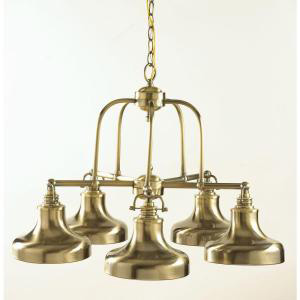
picture courtesy of Homedepot.com

Sadly, even at this awesome price, it doesn’t fit with my decor (wrong color), so my friend is going to take it. I also picked up two of these pendant lights that matched for $14 a piece and they too will need a new home (anyone??)…Most of the new lights in the house have come from the clearance sales at Home Depot and Lowe’s. I think the only things we’ve paid full price for was the fans for the master bedroom and the porch. I’ve picked up $4 bathroom light fixtures, new in the box, that were originally $139. It’s insane how low they will mark them down when they are just trying to get rid of the old stuff!
I am fortunate to have a brother who knows a lot, about a lot of things. He can fix just about anything, and is such a perfectionist that I know he’ll do it right. Since I don’t know a thing about electricity, Johnny started the week off with taking down two chandeliers (and put them back up when I was done repainting them!). One of my favorite bloggers that I found through Pinterest is Kate, from Centsational Girl, and she is a lover of spray paint. She has painted just about everything you can imagine with a fresh coat of spray paint, and I just love how her projects turn out! She’s done a few chandeliers/lights, including this one…

Centsational Girl's - chandelier after

so I read all her how-to blogs on the subject and jumped right in.

The chandeliers that were left by the previous owners are not exactly something I would choose, but these two have pretty good bones, just horrible finishes. I decided that before I got rid of them, I would attempt to re-paint them and see if they could be saved.

foyer light - before

This one is in the foyer. It’s a cruddy picture, sorry!

Foyer light - before

This pic shows the original color a little better…

And this one was over the dining room table.

Dining room light - Before

Why weren’t they the same color since they were literally next to each other (about ten feet apart) and basically the same style?? Not a clue.

Upon inspection, it turns out they were both originally had a gold finish. At some point, they were spray painted – and it was not a good job. The previous owner must have spray painted right over the dust. Lovely. I had to sand every last inch of them. Fun times. Don’t be jealous. I wiped them down, let them dry and then, I sprayed them with Rust-oleum Universal Metallic paint in Brushed Nickel. I was expecting it to be a little more silvery, but it had a little bit of yellow/gold tint to it. Either way, it was WAY better than it was.

And here they are after their mini-makeover…

Foyer chandelier - after

Dining Room chandelier - after

I love that they match now, and that they don’t look so dated. The only thing I’m worried about is whether I should have painted them black, since the gray we put on the walls is maybe too similar and they blend in too much? What do you think?

Another makeover that took place was the outdoor lights at the gate.

Gate light - before

They are at least 12 years old, and I doubt they have ever been cleaned. When we first moved in, they were on all day and night, and there wasn’t a switch in the house that operated them, and nothing at the gate turned them off and on either. Eventually, all of the bulbs blew out and we didn’t rush to replace them until we got them looked at by an electrician. My brother took them off the posts, we cleaned them out (ugh, so many dead bugs and other gross things) and he replaced the original bulb sockets from three candelabra lights to one standard light. This allowed us to use energy saver bulbs, which last longer and cost less to run than regular bulbs. When we had the electrician come, we found out that the sensor that was supposed to be turning it off every morning was defective, so we had that replaced. Now, they run from dusk ’til dawn, just like they are supposed to. I love to save money every place we can 🙂 After sanding down the worst of the rust and bubbled paint (there wasn’t much), I primed them with Rust-oleum metal primer and then used Rust-oleum Painter’s Touch in Espresso Satin finish spray paint.

Original lantern color - forgot to take the close-up before pic BEFORE we started!

And this is what they look like now…

Gate light - after

It’s amazing how just a good cleaning and a fresh coat of paint will bring something back to life! Eventually, we’ll replace them with something a little more substantial because they are a little small for the size of the post they sit on. For now, I’m just happy that they work, won’t cost an arm and a leg to run and look 10 times better than before!

Besides all of those lighting projects, we also had two lights installed off the back of the house, my brother replaced the broken motion detected light by the garage and the hubby switched out yet another bulb light for my new laundry room light. Suddenly, things are looking a lot brighter around here.

So, last week was all about getting the laundry room done, and changing the lights out around the house. This week is about getting things back in order and repainting the rest of the trim and doors around the house. I love how crisp and clean it looks and it makes the new color on the walls pop! I can’t wait to be finished with that task, it’s my least favorite thing to do.

What projects are you working on this week?

It almost makes me want to do laundry…

So, the laundry room re-do is done!! In case you don’t remember, because it was really not memorable at all, this is what it looked like last week.

Boring. Bland. A little depressing.

But now, after many days of work, and lots of energy spent, this is our new laundry room!

We replaced the old washer and dryer, and the new ones were my jumping off point for all the color choices. I was able to find an “oops” paint at Home Depot that worked perfectly with the dark teal. Have I said yet that saving money makes my day? I repainted the trim and doors to match the rest of the house. I used a oil-based paint from Sherwin Williams that is made specially for doors and trim. It covered in one coat, and it super durable. The puppy has already tested that out for me – he’s figured out that if he jumps on the door handles, the door will open! So far, not a scratch on the doors though, so I’m glad I opted for an oil base, even though the fumes are pretty heavy for a few days.

I love my new light that I got for $29 at Home Depot last week, originally $79. It is so bright compared to the dreadful “pimple” light that was there, and much less sad looking. It was just one of the 7 light fixtures that I bought for the house last week. They were clearing out their older stock, and getting rid of all their display items. (I’ll be posting the pendant lights I bought for $11 later – so cute!)

The cabinets that were above the washer and dryer were no longer easy to get into because the height of the new set, so we took off the doors and now I can get into them with much less effort.

The cabinet that was in the corner behind the door was great for storage, but really made no sense in the laundry room when there wasn’t a table to fold on, or a place to put the laundry baskets. One of the first things I pinned on Pinterest was this cabinet.

My original inspiration...http://pinterest.com/pin/49927730/

With a little modification to include a place to stash the dirty clothes hampers, this is our version. So, my brother moved the old white cabinet out into the garage for me and we replaced it with…

This!!!

I love it! I can’t tell you how many times I have tripped on the baskets coming into the house because there was simply no place to put them that wasn’t in the way – the room is just too narrow! So, I designed it to have four cubbies for baskets, one for each of the humans in the house, and a space to roll the dirty laundry containers into so they were out of the way.  This keeps the walkway clear, gives me room to fold and a place for each person to collect their basket of clean clothes (or rummage through it to pull out one thing and leave the rest is more like it!). It literally makes me happy just to see it! I painted it white first, then taped off the design and painted it the same color as the walls. Ideally, I would have loved to get a granite piece for the top, but I just don’t want to put out all that money when we still have lots to do around here.

We put up a shelf above the cabinet, and it’s the perfect place for the dogs’ medicines, shampoos and other grooming supplies, tucked away in the boxes, which keeps it from looking cluttered and messy. And I still have room for other “stuff” that I am sure will accumulate. And three years after I bought it, I finally hung up the octopus delicates dryer, after a coat of white spray paint! Our family’s collection of baseball hats seem to always get lost and had no where to “belong”, so we put an eight foot long hat rack along the wall that faces the washer and dryer.  It’s a perfect use of space that otherwise would have been unusable because of it’s high traffic flow.

And I made a leash hanger for by the door, using the same fabric I used for the boxes. Eventually, I’ll add some hooks for keys and my purse too.

 I love it when things have their own “home”. It makes it so much less stressful when you’re trying to get out the door.

The only thing I would still love to change is the ugly utility tub. It will happen, just not today.

So, there it is… it makes me giddy each time I go in there! I almost want to do laundry… almost.


Linking up to…

over at http://www.bowerpowerblog.com/2011/11/pinterest-challenge-project-antiqued-window/

My current project

Currently, I’ve been working on our laundry room. When we moved here, it was one of the first things I wanted to do, but it kept getting put off because of the nine hundred other things that took priority over it, like getting the water system working. This is the laundry room “before”.

   Like all the other rooms in the house, except for the kids’s bedrooms, it was painted a depressing cream. The entire house was painted, from baseboards to ceilings, a dirty, dingy cream color that just made me depressed to be in the house. Unfortunately, the tile is the same sad color too, and it runs throughout the house. Sorry, I’m getting off topic.  Anyway, as you can see, the laundry room is pretty narrow. It sits at the end of the hallway, and leads to the garage, so it’s a high traffic area. There was no space for laundry baskets or to sort clothes, etc. . Although I liked that it had that storage piece in there, I desperately wanted a table to fold clothes on. In the old house we had no room to fold either, so all the clothes were folded at the kitchen table. This was a royal pain in the tush because with four people living in the house, there was always laundry on the table and it looked so trashy. Since we’ve moved here, I’ve been doing the same thing here too, except on the dining room table which is right next to the front door. Highly embarrassing to have our undies on display when people “stop by” unexpectedly to see the new house.

In true “me” fashion, I’ve been searching Pinterest for ideas for a table/cabinet/place to stash the laundry baskets. I’ve found quite a few that I would love to have. Here are a few of my favorites…

I liked the long table right over the washer and dryer.I like the space for the dirty clothes bins

I love the skirt around the washtub (ours is very similar)

And finally, I loved the cabinet in the corner, but I need it for basket space.

So far, we have replaced the old washer and dryer with the ones we had at our previous house. They are the Electrolux ones in teal, so our color palette is already sort of set. I found an “oops” paint in a lighter shade of teal at Home Depot which is as close to perfect for the room as I could get. Unfortunately, it was a custom color match, so it has no name. Last week, my brother moved the cabinet in the corner to the garage, and I painted the room. The trim and doors were painted white to match the rest of the house, and it almost immediately got rid of the dingy feel of the previous colors. I love white for it’s ability to cheer a place up!

I couldn’t find any kind of cabinetry that fit exactly what I needed at any of the big box stores, and I didn’t want to pay a fortune to have one custom made. So, off to the Home Depot we went. I love that place. It makes me happier than any clothes store ever has. We bought all the supplies on Wednesday and on Friday, my brother came over to assemble the cabinet. It is almost done except for the painting and finishing touches. Which is what I am doing today. I would have loved to have finished the table top in some cool way, like this…

But I don’t have the time, or the liver, to collect all those bottle caps 😦 I also thought a penny table top would be cute, but I decided against it when I realized that no one would ever get to see it under the piles of clothes!

I think I am going to just paint it, then tape off a design, paint it again and call it a day. Even without the whole project finished, I am happier than a pig in poo right now, as I finally have a place in the “laundry room” to do laundry! When I finish, I’ll post the “after” pics. Wish me luck!

Have any recommendations for a cool table top?

Bathroom update

 As much as I hate to admit it, I am not the most creative designer on the planet. I AM pretty good at taking an idea and making changes to it so that it works for me. When I first started reading design/craft/home making blogs, Just a Girl’s blog was one of the first I started stalking, I mean following, and I fell in love with her bathroom renovation.

 (photo courtesy of Justagirlblog.com)

When we moved into the new house, I knew I wanted to do something similar with my son’s bathroom. This is the bathroom when we bought the house.

Just like everything else in the house, it was all builder grade and boring.

And so began the makeover. We changed out the sink and bathtub/shower faucets, painted the walls white, the ceiling a pale blue and the cabinets black, and changed the hardware on the cabinet doors. I chose to go with more of a nautical feel rather than a beachy theme.

I would still like to change out the medicine cabinet and make a frame for the big mirror, as well as replace the countertop with something more modern, but it will have to wait. I’m pretty happy with the update for now.

What are you wishing you could change in your bathroom?